Mini DVI, what it is and how to capture it
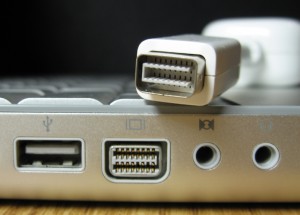
Mini DVI is a common connector found on Apple’s Macbook, Macbook Pro and Intel-based Powerbook G4 laptops that have been produced prior October 2008. A Mini DVI port can also be found on Apple’s Intel-based 1U XServe servers.
According to Apple, the creator and sole manufacturer of computers with Mini DVI ports, Mini DVI, like Mini VGA, was implemented to save space and allow for the production of smaller laptops. This, however has been disproven by other manufacturers like Dell or Toshiba which have all made notebook computers with similar sizes, form factors, and specifications to Apple’s, yet have been able to implement a full-size DVI port. The relatively steep price of the adapters manufactured by Apple to work with the Mini DVI port (over $50 for some models) hint at the real (financial) motives behind Apple’s decision to equip its computers with Mini DVI ports.
While the way that the port is named suggests that Mini DVI is just a miniature version of the full-size DVI port, the Mini DVI port actually carries three different signals:
- Single-link DVI (Digital)
- VGA (Analog)
- TV (Analog)
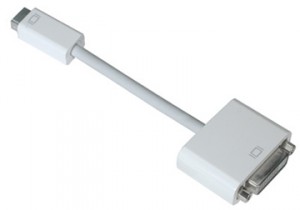
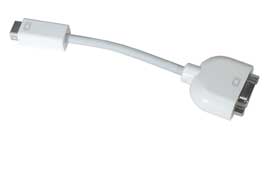
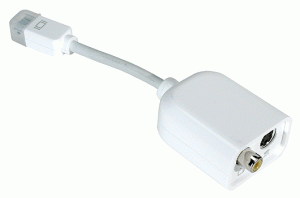
In order to convert the Mini DVI signal to any of the three signals mentioned above, a special adapter is required for each application.
1. Mini DVI to DVI (Single Link)
2. Mini DVI to VGA
3. Mini DVI to Video (TV RCA + S-Video)
A Mini DVI to HDMI adapter is also available on the market, but, unlike the three adapters shown above, is not manufactured by Apple.
Capturing Video from the Mini DVI Port
Since the Mini DVI port can be easily converted to DVI, VGA, or TV-out using adapters manufactured by Apple, a Mini DVI signal can be captured using a DVI or VGA frame grabber or a video capture card for TV/S-Video signals. Note that, since the DVI signal is single link, Mini DVI does not support resolutions higher than 1920×1200 @ 60Hz.
Please refer to our Frame Grabber Comparison Table to evaluate possible alternatives for VGA and DVI frame grabbers.
Technical Information and Specifications
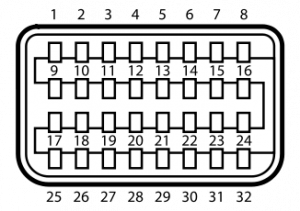
For advanced users doing custom product development based on Mini DVI, below is a pinout of the Mini DVI port. Source.
| Pin 1 | Dat2_P | Data 2 + |
| Pin 2 | Dat2_N | Data 2 - |
| Pin 3 | Dat1_P | Data 1 + |
| Pin 4 | Dat1_N | Data 1 - |
| Pin 5 | Dat0_P | Data 0 + |
| Pin 6 | Dat0_N | Data 0 - |
| Pin 7 | CLK_P | Clock + |
| Pin 8 | CLK_N | Clock - |
| Pin 9 | DGND | |
| Pin 10 | DGND | |
| Pin 11 | DGND | |
| Pin 12 | DGND | |
| Pin 13 | DGND | |
| Pin 14 | DGND | |
| Pin 15 | DGND | |
| Pin 16 | DGND | |
| Pin 17 | +5 V | |
| Pin 18 | DCC_DAT | |
| Pin 19 | spare | |
| Pin 20 | BLUE | Analogue blue |
| Pin 21 | not installed | |
| Pin 22 | GREEN | Analogue green |
| Pin 23 | not installed | |
| Pin 24 | RED | Analogue red |
| Pin 25 | Detect | |
| Pin 26 | DCC_CLK | |
| Pin 27 | spare | |
| Pin 28 | DGND | |
| Pin 29 | HSYNC | Horizontal sync |
| Pin 30 | DGND | |
| Pin 31 | VSYNC | Vertical sync |
| Pin 32 | DGND |
PrintScreen from Windows XP or Vista on a MAC
August 11, 2008 by Victor · 2 Comments
The new generation of Intel-powered Apple computers fully supports Windows XP and Vista through BootCamp. But, due to the fact that the MAC keyboard has less keys than that of its PC counterpart, the indispensable “Print Screen” function, which lets one take a screenshot of the screen, is no longer apparent to the average user.
In order to launch the “PrintScreen” function from a Mac running Windows XP or Windows Vista through BootCamp, including MacBook, MacBook Pro, MacBook Air, Mac Mini, or Mac Pro, you must first verify if the F1-F12 keys on your machine are controlling software or hardware features of the computer. To do this, you must first access the Keyboard tab of the “Boot Camp” icon in the Windows Control Panel and check if the “Use F1-F12 keys to control software” option is selected.
If the option is selected, then the following shortcuts must be used to perform the PrintScreen command in Windows:
Shift + F11 to capture the entire screen
Alt + Shift + F11 to take screenshot of the active window only
If the “Use F1-F12 keys to control software” option is unselected and the F1-F12 keys are used to control hardware features, then the following combination of keys is to be used to perform a printscreen:
Shift + fn + F11 to capture the entire screen
Alt + Shift + fn + F11 to capture a screenshot of the active window only
You have now emulated the PrintScreen key of a PC keyboard on your Mac!


