Capture and Record Video from Apple iPad
May 25, 2010 by Victor · 8 Comments
The new iPad by Apple, a supersized version of the iPod/iPhone, is a tablet computer that features a 9.7″ display with multitouch touch screen technology, running at a resolution of 1024×768.
Recording the entire screen would come in very handy for development, troubleshooting, training videos, demos, podcasts, and even direct broadcasts from the iPad screen.
While a native software solution to iPad screen capture is either weak or nonexistent, there is an ideal and low-cost hardware capture solution that will allow you to capture the entire contents of the screen without slowing down or otherwise altering the functionality of the Apple iPad.
This solution consists of two things: the Apple iPad dock connector to VGA adapter (pictured below), available from the Apple store ($29) and the Epiphan Systems VGA2USB ($299).
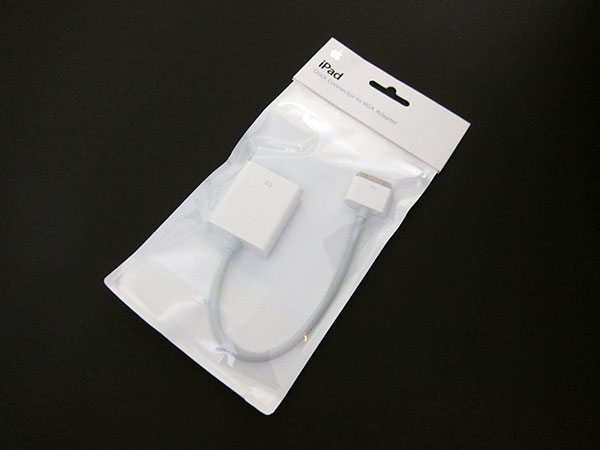
The iPad to VGA dock connector currently allows you to add a VGA port to the Apple iPad and mirror the image on the iPad’s screen on the output. In the future, Apple will add support for applications to use this external output.
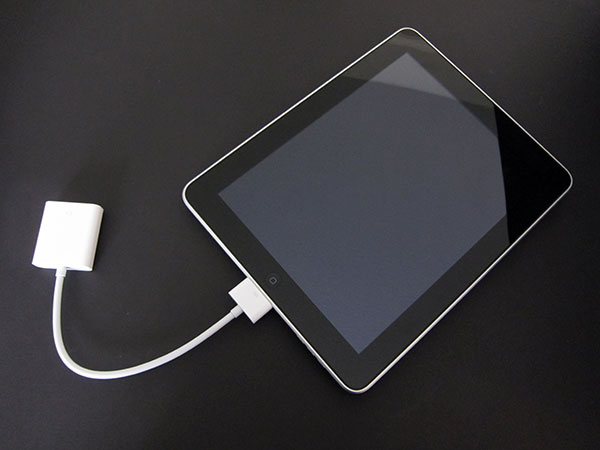
In order to record video from Apple’s iPad, we must begin by connecting the iPad to VGA adapter to the iPad, and connecting the Epiphan Systems VGA2USB to the VGA side of the adapter. A more detailed diagram is shown below:
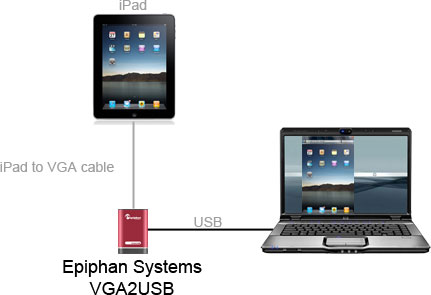
The captured video from the iPad can be recorded on the computer using free software provided by Epiphan Systems, or any other video capture software that supports external devices, such as Adobe Premiere or VirtualDub.
Furthermore, the images and video from the iPad can also be broadcast using software such as Windows Media Encoder or QuickTime Broadcaster.
More information on the VGA2USB can be obtained directly from Epiphan’s website here: http://www.epiphan.com/products/frame-grabbers/vga2usb/
Emulate a screen capture card on your computer… for free!
September 2, 2008 by Victor · Leave a Comment
Have you ever wanted to use your video capture software of choice for creating screen captures, broadcasting live from your screen, or creating videos? Are you a software developer that would like to integrate screen capture into your software package? If your answer to one of these questions is “yes” then we have a solution for you… for free!
The solution is to use a free tiny (<1MB) utility called VH Screen Capture Driver by Hmelyoff Labs. VH Screen Capture driver works by emulating a video capture card in your Windows system, with the output being that of your local monitor. Think of it as a software-based frame grabber that works on Windows machines only. However, do not think of this software as complete replacement to frame grabbers, as it has many major disadvantages over its’ hardware counterparts.
First of all, the screen capture driver uses up a vast amount of system resources, meaning that more advanced applications will not have good capture quality, whereas a frame grabber uses its’ own resources only and puts no extra load on the system. The VH Screen Capture Driver is also only compatible with Windows machines and, being a DirectShow filter, will not work with all applications. A frame grabber however, is compatible with any VGA or DVI output, whether it be from a MAC, Windows machine, high-resolution navigational equipment, etc. Thus, VH Screen Capture is good as a free solution but in no way can this software match all of the advantages that frame grabbers entail.
Technically, however, VH Screen Capture Driver is a DirectShow filter and is compatible with applications that use DirectShow to display content on the user’s screen. The output frame rate does depend on which application is being captured and the system load.
In short, VH Screen Capture Driver allows the user to use popular video capture and broadcast applications, such as Windows Media Encoder and Adobe Premiere, without native screen capture support to grab the image off of their screen.
Using VH Screen Capture Driver
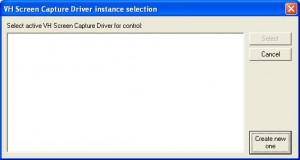
Step 1: Install the program and run it. You should immediately see the following screen. Press “create new one” to start a new instance of the capture driver.
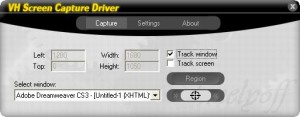
Step 2: You will now see a configuration window. Under the “Capture” tab, you may choose the “Region” option and select only a region of the screen to broadcast. Ticking the “Track window” option enables you to broadcast a single application. You may select it by choosing it from the drop-down list or by clicking on the crosshairs beside the drop-down list and then selecting the application.
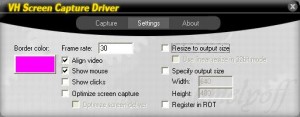
Step 3: Now select the “Settings” tab. Here you can adjust the maximum output frame rate, whether to show your cursor, or whether to compress the screen capture output. If you would like to resize your output in real time, the “Resize to output size” option must be ticked and the output size (Width/Height boxes) must be specified. This is most useful when you are broadcasting to the web and would like to limit the output video resolution in order to use less bandwidth or obtain a smaller file size.
Congratulations! The VH Screen Capture Driver is now configured. Now go to your video capture application of choice, select the “VH Screen Capture Driver” as an input, and start capturing!


